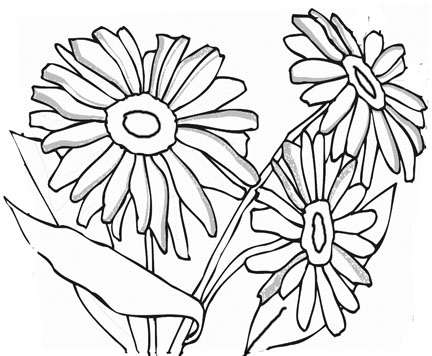
How To Draw a Rose By Following These Easy Steps  Here is a step-by-step lesson on How To Draw a Rose in 7 easy-to-do steps. Follow these steps and you should be able to master the fundamentals of drawing roses. Let's start off with one of the simplest roses to draw like the "Rosehip" rose or, in precise terms, Rosa Canina which is a scrambling rose mainly native to Europe. This rose has 5 or 7 petals and the leaves are pinnate (meaning that they have similar parts arranged on opposite sides of an axis like a leaf's stem or a feather. This type of rose is usually pink but sometimes you will see them in white. Use an HB or 2B pencil on white paper, photocopy paper is ideal to start off with. Later, when you have built up lots of confidence, go to your local art store and buy drawing paper. Get acid free so it does not go yellow over time. The basic shape of roses and nearly all flowers are either oval or round. All petals stem from a central point at the top of the stem...in other words everything in the flower head grows outwards from the stem. Have a close look at this and pluck out the petals and you will see where they grow from.
 Step One In this tutorial on How To Draw a Rose, draw freely by hand an oval or egg shape with a smaller oval inside as shown here. You can practice drawing an oval until you feel it looks just right - it does not have to be perfect. The size can be just a couple of inches across.
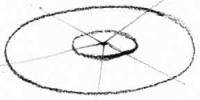 Step Two Place a dot in the center of the inner oval. Now you are going to divide the oval into five sections starting from the dot in the middle and extending to the outer oval. Copy this drawing to get an idea but it does not have to be the same - as long as you divide it more or less equally. It does not look much like a five-petal rose yet but it will.
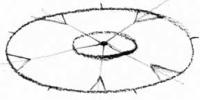 Step Three Draw as shown in this sketch, five V's pointing towards the center dot and place them on the edge of the outside pointing in as in the sketch. Next, put a small pencil mark to indicate a halfway mark on the outside oval. This will show where the outside tip of the petal will be. Your sketch does not have to be perfect, just do it rough sketch by hand and you will be delighted with it.
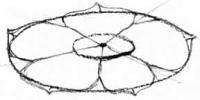 Step Four Starting from the small mark in the center between the V's, draw a line like an elongated S as shown here. Do this with all five petals so you'll have 10 S's.
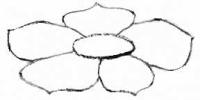 Step Five Get your eraser and rub out all the guidelines including the outside oval as you can see in this sketch. Pretty easy eh on How To Draw a Rose?
 Step Six Now draw a small oval inside the center oval and leave a small gap about equal all the way around. Also draw a smallish line from the center oval in the middle of the petal going halfway towards the point or tip of the petal.
 Step Seven. You've nearly completed your drawing! This is the easy part. Draw a line straight down from the middle of the oval although you do not see the line as it is behind the rose. Then draw two lines for the leaves at about 45 degrees as shown here. Put in the leaf shape and that completes your sketch. Cool huh? There will be lots more tutorials on How To Draw a Rose of different varieties and also other types of flowers. They will be fairly simple to sketch with step-by-step instructions. Hope you enjoy them so stay tuned!
 Your final Step Splash a little color here and there.
| 


